(2) Clean sumv tank and filter thorou~hlv with
[3) Ins~ect filter for damze.
cleani~ solvent, Fe~eral Specification P-D--680.
b.
Inspection.
—
(1) Inspect threaded areas for damage.
(2) Inspect sump tank (21) for cracks or
distort ion.
S e c t i o n X X V I I .
3 - 1 7 9 .
G e n e r a l .
The engine assembly and components generate the
mechanical power to drive the generator.
3 - 1 8 0 .
E n g i n e
A s s e m b l y
T e s t i n g .
a. Testing. To test the engine assembly proceed
as Follows:
(1) With engine running, test for overheating
by observing COOLANT TEMPERATURE
indicator
( f i g . 2 - 5 ) .
(2) With engine running test for proper oil
pressure by observing OIL PRESSURE indicator
( f i g . 2 - 5 ) .
(3) With engine running test by listening for
engine knocks, excessive noise and visually observe
for vibrations.
(4) With engine ruining observe exhaust for
excessive black, gray, or blue emissions.
.,.
<.
3 - 1 7 8 .
I n s t a l l a t i o n .
a. See f i g u r e 3 - 3 3 and install sump tank (21) and
filt=r in reverse order of removal.
~. Connect hydraulic lines.
c.
Fill sump with hydraulic oil, MIL-H-5606.
—
E N G I N E
A S S E M B L Y
(5) With engine running observe BATTERY
CHG AMMETER ( f i g . 2 - 5 ) for proper charging
indication.
3 - 1 8 1 .
D r a i n
H o s e s .
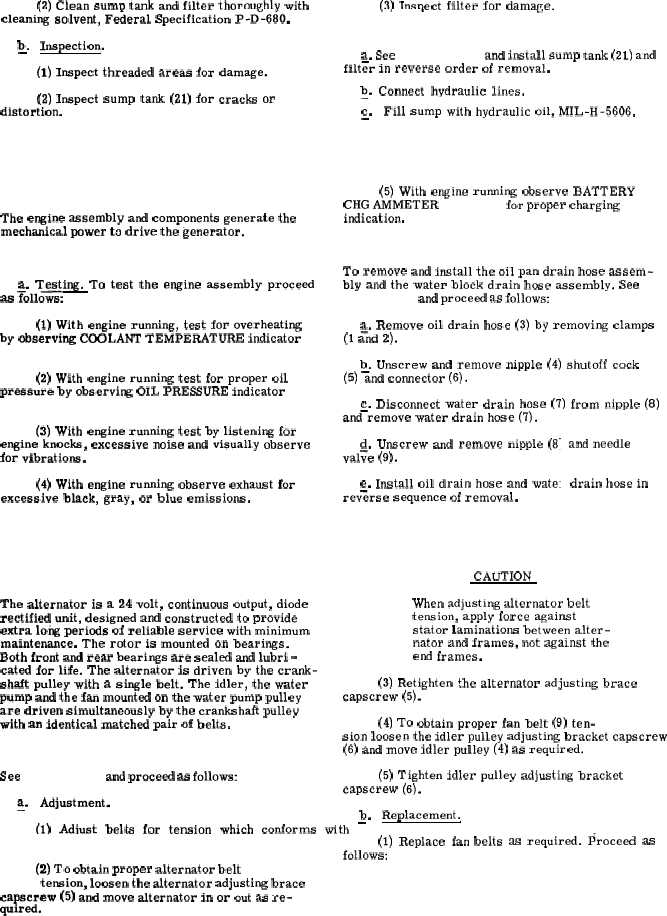
To remove and install the oil pan drain hose assem-
bly and the water block drain hcse assembly. See
f i g u r e
3 - 3 4 and proceed as follows:
a. Remove oil drain hose (3) by removing clamps
(1 ;nd 2).
b. Unscrew and remove nipple (4) shutoff cock
(5) =nd connector (6).
c. Disconnect water drain hose (7) from nipple (8)
and–remove water drain hose (7).
d. Unscrew and remove nipple (8
val;e (9).
e. Install oil drain hose and wate:
rev<rse sequence of removal.
S e c t i o n
X X V I I I .
A L T E R N A T O R
A N D
R E L A T E D
P A R T S
3 - 1 8 2 .
G e n e r a l .
CAUTION
The alternator is a 24 volt, continuous output, diode
rectified unit, designed and constructed to provide
extra long periods of reliable service with minimum
maintenance. The rotor is mounted on bearings.
Both front and rear bearings are sealed and lubri -
cated for life. The alternator is driven by the crank-
shaft pulley with a single belt. The idler, the water
pump and the fan mounted on the water pump pulley
are driven simultaneously by the crankshaft pulley
with an identical matched pair of belts.
3 - 1 8 3 .
D r i v e
B e l t s .
See f i g u r e 3 - 3 5 . and proceed as follows:
and needle
drain hose in
When adjusting alternator belt
tension, apply force against
stator laminations between alter-
nator and frames, not against the
end frames.
(3) Retighten the alternator adjusting brace
capscrew (5).
(4) To obtain proper fan belt (9) ten-
sion loosen the idler pulley adjusting bracket capscrew
(6) and move idler pulley (4) as required.
(5) Tighten idler pulley adjusting bracket
capscrew (6).
~.
Adjustment.
b.
Replacement.
(1)
Adiust
belts
for
tension
which
conforms
with
–
t a b l e
3 - 1 .
(1) Replace fan
follows:
(2) To obtain proper altermtor belt ( 7 , f i g .
3 - 3 5 ) tension, loosen the alternator adjusting brace
caPscrew (5) and move alternator in or out as re-
quired.
belts as required. Proceed as
3 - 8 7