ARMY TM 9-6115-464-12
AIR FORCE TO 35C2-3-445-1
NAVY NAVFAC P-8-624-12
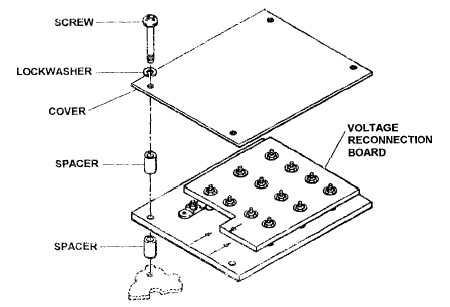
Figure 4-45. Voltage Rconnection Board, Removal and Installation
4-72 MAIN LOAD CONTACTOR
a. Inspection. visually inspect Main Load container (Figure 1-5) for insecure mounting, loose electrical connec-
tions, cracks, corrosion, and evidence of shorting or other damage.
b. Testing.
Using a multimeter or a continuity light, check for open circuit across terminal studs A1 and A2, B1
and B2, and C1 and C2 (figures FO-1 and FO-2).
Check for open circuit across connector pins C and D, E and F, G and H, J and K, and R and T.
Check for continuity between connector pins A and B, L and M, N and P, and R and S.
Apply 24 Vdc across connector pins A and B while listening for audible indication of actuation.
With the actuator coil energized, check for continuity between connector pins C and D, E and F, G
and H, J and K, and R and T.
Check for open circuit across connector pins L and M, N and P, and R and S.
Check for continuity across terminal studs A1 and A2, B1 and B2, and C1 and C2.
Disconnect 24 Vdc source from connector pins A and B.
c.
Removal.
(1) Remove screws (1, Figure 4-46), Iockwashers (2), and flat washers (3) to remove terminal covers (4).
(2) Tag and disconnect electrical leads to terminals.
(3) Disconnect wiring harness connector from main load contactor connector.
(4) Remove nuts (5) and screws (6) to remove main load contactor.
d. Installation.
(1) Install main load contador and secure with screws (6, Figure 4-46) and nuts (5).
(2) Connect wiring harness connector to main load conatactor connector.
(3) Connect electrical leads to terminals.
(4) Install terminal covers (4) and secure with flat washers (3), Iockwashers (2) and screws (1).
4-109


