TM 9-6115-604-34
NAVFAC P-8-633-34
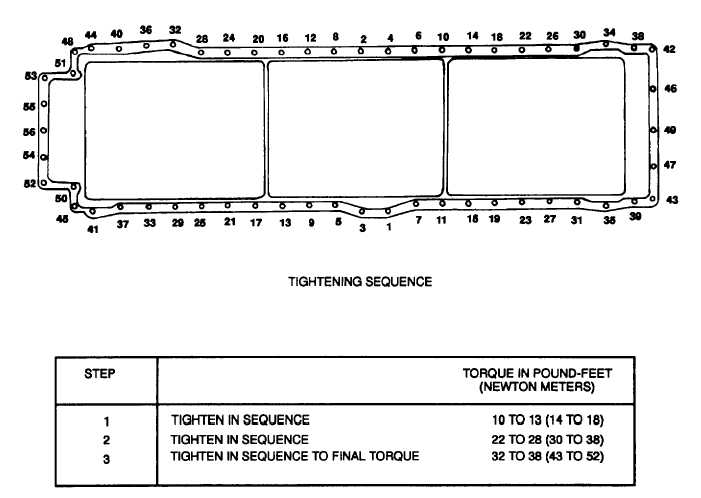
Figure 9-69. Tightening Procedure, Oil Pan Adapter
(1)
Fabricate ten guide studs (refer to Table 2-2) for the oil pan adapter (20) and install three studs on each
side of the cylinder block, and two on each end.
(2)
Coat a new adapter gasket (21) with sealant MIL-S-45180, and install it over the guide studs.
(3)
Position the oil pan adapter (20) over the guide studs, and install 46 capscrews (18 and 19) using
lockwashers (7) and washers (8). Screw the capscrews in several threads, but do not tighten them at this
time.
(4)
Remove the guide studs, install the remaining capscrews (18 and 19), using the lockwashers (7) and
washers (8).Using the sequence in Figure 9-69, tighten all capscrews until they are snug.
(5)
Using the sequence, steps, and torque given in Figure 9-69, tighten all capscrews (18 and 19, Figure 948).
(6)
Coat new gaskets (10) with sealant MIL-S-45180, and position them on the covers (17), if removed.
(7)
Install the covers (17) on the oil pan adapter (20) using the capscrews (16), lockwashers (7), and washers
(8). Cross-tighten the cap screws in three steps to 32 to 38 pound-feet (43 to 52 newton-meters).
(8)
Using new ring spacers (2), install the drain plugs (1) in the covers (17), and tighten to 60 to 70 pound-feet
(81 to 95 newton-meters).
(9)
Install the drain valve (4) in the oil pan (9), and install the adapter (5) in the drain valve, if removed.
Tighten the adapter (5) and drain valve (4) in accordance with Table 1-3.
(10)
Coat a new gasket (10) with sealant MIL-S451 80, and position it on the oil pan (9).
(11)
Install the oil pan (9) on the oil pan adapter (20) using the capscrews (6), lockwashers (7), and washers (8).
Cross-tighten the cap screws in three steps to 32 to 38 pound-feet (43 to 52 newton-meters).
(12)
Connect the overboard drain hose to the adapter (5) and the filter return line to the adapter (14).
9-121


