TM 9-6115-604-34
NAVFAC P-8-633-34
(f)
Inspect for grinder bum and rehardening in filet and side wall areas. The etched surface should be a
uniform light gray color.
(g)
Streaks or spots darker than the light gray background are evidence of grinder burn damage.
(h)
Streaks or spots lighter than the gray background are evidence of rehardening.
(i)
Grinder bum rehardening or damage is not permissible in the fillet or journal surface area. If
damage is present, and the journals have been turned to the maximum undersize, replace the
crankshaft.
(j)
In case of questionable patterns, polish out the etch coloring and repeat the procedure. Sometimes
a pattern will occur from non-uniform swabbing, but if patterns are present, they will reoccur in the
same place and pattern with repeated etch checks.
(k)
Crankshaft found to have grinder bum or rehardening damage may possibly be salvaged by grinding
a few thousandths from the side walls and grinding to the next standard undersize.
(I)
After completing the etch check, polish out the etching discoloration on acceptable crankshafts.
Thoroughly treat the etched surfaces and oil holes with preservative oil MIL-L-21260.
(45)
Check the crankshaft alignment in accordance with step d, above. Remove the crankshaft from grinding
machine and straighten as necessary in accordance with step e, above.
(46)
Inspect crankshaft using magnetic fluorescent inspection in accordance with step d, above.
(47)
Clean the crankshaft in accordance with step c, above, to remove accumulated grinding dust and magnetic
inspection compound, and dry thoroughly with compressed air.
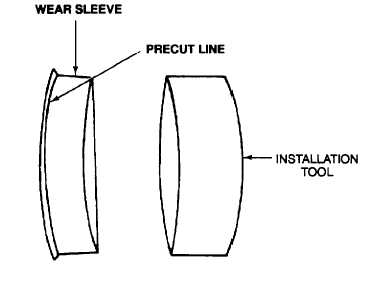
Figure 9-53. Seal Surface Wear Sleeve Kit
(48)
If the front or rear seal surface is unacceptable, install a wear sleeve over the worn area as follows (see
Figure 9-53):
NOTE
The procedure given below shall be used for either front or rear wear sleeve. For the front seal surface
use part number 3006236; for the rear seal surface use part number 3006238. These wear sleeves are to
be used only with LDL-TFE oil seals. An installation tool is provided with the wear sleeve.
(a)
If a wear sleeve has been previously installed, remove the old wear sleeve using a 0.75 inch (19
mm) chisel and a hammer. Grind a 0.063 inch (1.60 mm) radius on the cutting edge of the chisel.
Using moderate blows with the hammer, strike the chisel against the wear sleeve at three to six
equidistant points on the outside diameter of the wear sleeve. This will relieve the press fit of the
sleeve allowing it to be removed by hand.
(b)
Clean the old seal surface thoroughly. File down any burrs and dean up any rough spots.
9-94


